Sunday, July 25, 2010

Quick Gift Bag Tutorial

Need a quick gift bag and don't have one handy? This one took about 2 minutes to make!
How To:

-measure your gift and cut your fabric to be bigger than the gift
-sew up your sides, leaving 1 side open for the top (I just over locked mine and saved the step)
-cut the top with pinking sheers
-insert gift, tie the top with ribbon and add a tag
:-)

*Optional Letter- This gift was for one of my blankets for a baby shower. They don't know the name of the baby, so I cut the letter of their last name out of a different fabric, ironed on some wonder-under, peeled off the backing and ironed on. It would have been cute with some stitching around it too, but that would take more than 2 minutes and that's all I had left before leaving for the party!
Boy or Girl?


I hate getting gifts if they don't know if the baby is going to be a girl or a boy. I love knowing what it is and going all out in one direction. So, this baby shower this past weekend had me stumped and I even considered giving an IOU for a blanket. But I decided last minute to go with yellow. I LOVE this fabric I've been gathering the past few years. It's really hard to find minky in these prints. This blanket is ALL minky (there's a yellow with white dot, yellow with white stripe, solid yellow, white dot, and white line). I had just enough to do this quilt. The mom-to-be loved it! I have enough fabric to do 1 more so I'm going to post this in my shop and offer free embroidery of a name or initials. I LOVE this yellow!

Saturday, July 3, 2010

Happy 4th of July!

Finally got my 4th of July table runner done for this year! I've enjoyed it. Hope you have a wonderful weekend!


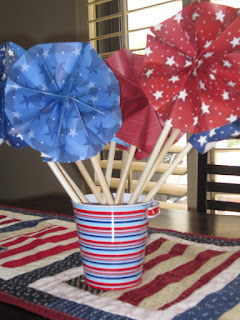
4th of July Centerpiece

Need a quick idea for a 4th of July Centerpiece? Here's a cute one I'm using this weekend for a pool party! Each table has a bucket and 2 pinwheels.
Materials Needed:
Paper
Dowels
Something to put them in
How To:
1-My paper started out as the 9x13 scrapbook paper. Cut this in half on the long side. You can play with this and made them all different sizes. 2- Accordion the paper (like you were making yourself a fan). 3- Then put a staple right in the middle to hold the accordion closed. 4- Now take the 2 opposite ends and pull them together making one half of the circle. Do again with the other side to make a complete circle. I used glue to hold them together and secured with paper clips until it all dried. You could also use double sided tape or staples. 5- Attach your dowel on the back and insert into a vase, bucket, flower arrangement, etc.
*Also looks cute with double sided paper
*Would be super cute for baby shower and Spring Holiday's too